Introduction to Web Design and Roles
Workplace Context
You are starting as a junior member of a creative team at a digital agency. Your team collaborates closely to design visually appealing, functional, and user-friendly websites for clients. As you begin working on your first project, it’s essential to understand the distinct roles and stages in the web design process, so you can contribute effectively and communicate seamlessly with designers and developers.
Learning Objectives
By the end of this lesson, you will be able to:
- Describe the roles of web designers and developers, and their unique contributions to a web project.
- Outline the key stages in the web design process.
- Explain the purpose and best practices of wireframing in web design.
Understanding Roles in Web Design
Web design projects involve collaboration between designers and developers, each with a specific focus:
- Web Designers: Responsible for the visual and interactive aspects of a website. They create prototypes and wireframes, choose color schemes, and design the user interface (UI). Designers work with tools like Figma to create layouts and visual assets that are handed off to developers.
- Web Developers: Turn design files into functional websites. Developers work with both front-end (HTML, CSS, JavaScript) and back-end (server, database) technologies. They ensure the website is accessible, responsive, and optimized for performance.

While web designers and web developers often work together, their responsibilities and general job functions are very different.
What is the primary responsibility of a web designer?
- Select an answer to view feedback.
Activity: Reflect on Roles
Task: Think of a website you use frequently. Discuss how the roles of designers and developers might have contributed to that website’s appearance, navigation, and functionality.
The Web Design Process
The process each company undergoes when creating a new website or web application varies, but it can generally be summarized in the following steps:
Key Stages of Web Design
-
Planning and Discovery
- Goals are defined, audience is analyzed, and project requirements are gathered. This stage involves communication between stakeholders to clarify the website’s purpose.
-
Requirements Gathering
- Information is collected on design, functionality, and performance needs. This may involve consulting with users or reviewing similar sites to set expectations.
-
Design and Prototyping
- Designers create wireframes (website blueprints) and prototypes (interactive mockups), outlining the layout and interactive elements. Feedback is gathered, and revisions are made before moving to development.
-
Development
- Developers build the site according to design specifications. Front-end developers work on the visible part of the site, while back-end developers set up the server, database, and logic.
-
Testing
- The site undergoes usability testing and quality checks to ensure compatibility across devices and browsers. Bugs and accessibility issues are fixed in this phase.
-
Launch
- The site is deployed to a live server, making it publicly accessible. A soft launch (limited release) may be done initially to catch any missed issues.
-
Continuous Updates
- Updates are made based on user feedback, performance metrics, or changing technology standards.
We will specifically focus on the tools and techniques used for the design and prototyping stage of the process, starting with wireframes.
Which stage of the design process involves gathering user needs and project specifications?
- Select an answer to view feedback.
Wireframing Basics
Wireframes are essential tools that designers use to plan and communicate the layout and structure of a website before adding colors, fonts, and images. They provide a visual guide to the placement of content, navigation, and interactive elements.
Wireframes are bare-minimum representations of a website that do not usually include any fancy design or aesthetics.
A good wireframe will establish a solid foundation for the web developer to build upon by mapping out the content, functionality, and navigation scheme of a website or web application.
Here’s an example of a wireframe that represents a potential layout for a YouTube page:
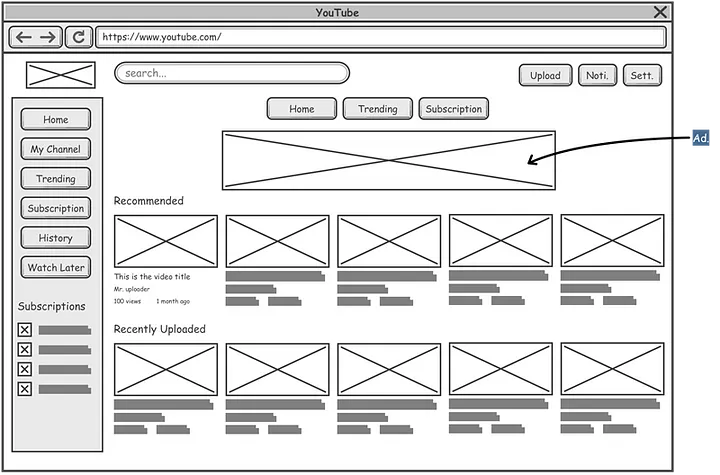
Source: Medium
Purpose of Wireframes
- Blueprint: Wireframes act as a blueprint, showing the arrangement of major page elements.
- Efficiency: By finalizing layout and content early on, wireframes help avoid costly changes during development.
- Clarity: Wireframes create a shared understanding among team members and stakeholders, enabling them to visualize the site’s structure.
Wireframe Best Practices
- Use Simple Shapes: Avoid unnecessary detail; use boxes, lines, and grayscale to represent different sections.
- Prioritize Content: Focus on arranging main content sections like headers, navigation, sidebars, and footers.
- Add Notes: Annotate sections to explain their purpose and interactions.
- Keep It Consistent: Use a uniform layout for all wireframes to maintain consistency.
Activity: Creating a Simple Wireframe
There are many software tools available to aid in the creation of wireframes, but for the purposes of learning, we will be starting with the basics.
Grab a piece of paper and a pen or pencil.
If you do not have those readily available, this can also be accomplished in a simple drawing application like Microsoft Paint.
As we build our website’s wireframe, we will discuss wireframing best practices.
First, we need some goals. As part of the planning and requirements gathering process, project management should create these for you, or at least with your input.
For our purposes, assume you have been given the following requirements:
- We need a screen for collecting user information.
- When customers submit their information, we need to send them to a “Welcome” page.
- The “Welcome” page needs to include images and descriptions of our top three best- selling products with purchase links.
- The “Welcome” page should also include an “about us” section.
Take a few minutes to get started by creating a draft wireframe of these two screens, and make sure to keep these requirements available somewhere.
Here is an example of a wireframe created for this scenario. If your drafts look vastly different, that is okay! Design is a creative process, and can vary wildly.

These wireframes are not quite correct. There are issues that need to be addressed!
Another best practice to keep in mind when creating wireframes is to use real content, not placeholder text, where possible. This can help with feedback gathering by putting things into context, and help to identify issues with content constraints.

Finally, do not be afraid to use annotations to explain different elements within your wireframe. Not everything will have an obvious purpose at a glance.

- Second password field for verification. Include validation warnings and errors.
- Address selector through Maps program.
- Submit button disabled until all information is validated.
- Begin with top three items. Can enable a carousel here to cycle through top nine to twelve best-selling items.
The last step to creating good wireframes is iteration.
Like most elements of design and development, wireframes must be iterated upon gradually in order to improve them. Old wireframes can have components added, subtracted, and upgraded just like the web application itself.
Do not be afraid to take what you have created and change it for the better!
Wireframe Complexity
Wireframes can also vary in terms of complexity and design even though they are generally just low-fidelity skeletons of a web application.
In order to provide more detailed information to web developers, web designers often use software tools to create actual UI designs that evolve from wireframes. There are many design and prototyping tools available; some of the most popular include:
- Figma , the most commonly used tool for wireframing and web design; considered the industry standard.
- We will be discussing Figma in the next section of this lesson.
- Adobe XD , which was recently discontinued after Adobe failed to acquire Figma.
- Sketch , which is a tool primarily for Mac-based design.
Activity: From Wireframe to website
Spend the next twenty (20) minutes taking the wireframe you built, or the example wireframe from this presentation, and turning it into a web page using basic HTML and CSS. Do not worry about completing the design or about adhering perfectly to the style or layout.
While working, ponder the following questions:
- What information is the wireframe missing that would make your job easier?
- How does the scale and ratio of the wireframe affect your implementation?
- What key elements from the wireframe might need functional implementation with JavaScript before being considered complete?
Knowledge Check
What is the primary purpose of a wireframe in the design process?
- Select an answer to view feedback.
Summary
In this lesson, you explored the unique roles of web designers and developers, the stages of the web design process, and the purpose of wireframing. By mastering these foundational concepts, you will be able to collaborate effectively and contribute meaningfully to web design projects.